
4. Binary Semaphores
In the previous tutorial, we have seen that every task needs to implement a waiting mechanism. Simple delays are involved for tasks requiring periodic activation. What if we want to trig a task execution based on an event coming from another task? There are several options to do that. You can use one of the available kernel objects to carry an information from one task to one (or several) other tasks. Such mechanism is called task synchronization.
Among common kernel synchronization objects, we find:
Semaphores (binary semaphores, counting semaphores)
Mutexes
Message Queues
Event Groups
The above objects have different working principles, and are involved depending on your needs. You may also use direct Notifications (from one task to another), which is another mechanism that does not involve an interface object.
1. The Binary Semaphore
Let us start with the first one: the Binary Semaphore. It is called 'binary' because it has only two states:
The semaphore exists (it has been 'given')
The semaphore doesn't exist (it was never given, or it has already been 'taken')
The binary semaphore can be used to implement a basic synchronization mechanism between two tasks as illustrated below:
Let us assume that Task_A has a higher priority level than the one of Task_B.
At time #1, Task_A is running, but Task_B is in a blocked state since it is waiting for xSem semaphore that no task already gave.
At time #2, Task_A reaches the point where it gives xSem semaphore. Task_B does not resume immediately but enters a ready state, since the xSem semaphore is now available. Task_B is now eligible for execution, but it belongs to the scheduler do decide whether Task_B can run now or later.
At time #3, Task_A reaches a suspending delay and enters a blocked state. The scheduler then resumes Task_B which takes xSem semaphore and proceed along. xSem semaphore is then dropped and no more available. Once a binary semaphore has been taken, it is 'killed' (i.e. you can't take it twice) until it is given again.

Let us illustrate this mechanism with our simple two-tasks project from previous tutorials. Let say that now, we want Task_2 to display the console message every time Task_1 has completed 10 LED toggles.
The first step is to declare the semaphore object as global variable. Let us call our semaphore 'xSem':
...
// FreeRTOS tasks
void vTask1 	(void *pvParameters);
void vTask2 	(void *pvParameters);
// Kernel objects
xSemaphoreHandle xSem;
...
Then, we need to create the semaphore. We must create the semaphore before any task tries to use it (otherwise OS crashes). Let us do it in the initialization part of main() function:
...
	// Start Trace Recording
	xTraceEnable(TRC_START);
	// Create Semaphore object (this is not a 'give')
	xSem = xSemaphoreCreateBinary();
	// Give a nice name to the Semaphore in the trace recorder
	vTraceSetSemaphoreName(xSem, "xSEM");
	// Create Tasks
	xTaskCreate(vTask1, "Task_1", 256, NULL, 1, NULL);
	xTaskCreate(vTask2, "Task_2", 256, NULL, 2, NULL);
	// Start the Scheduler
	vTaskStartScheduler();
...
Creating the semaphore object only initializes the data structure behind. This is not a 'give' action.
Note that the xSem variable is actually a pointer to a semaphore structure. If you're curious, you can explore that structure in the Expressions view of the debugger and see what happens when you step through the xSemaphoreCreateBinary() function.
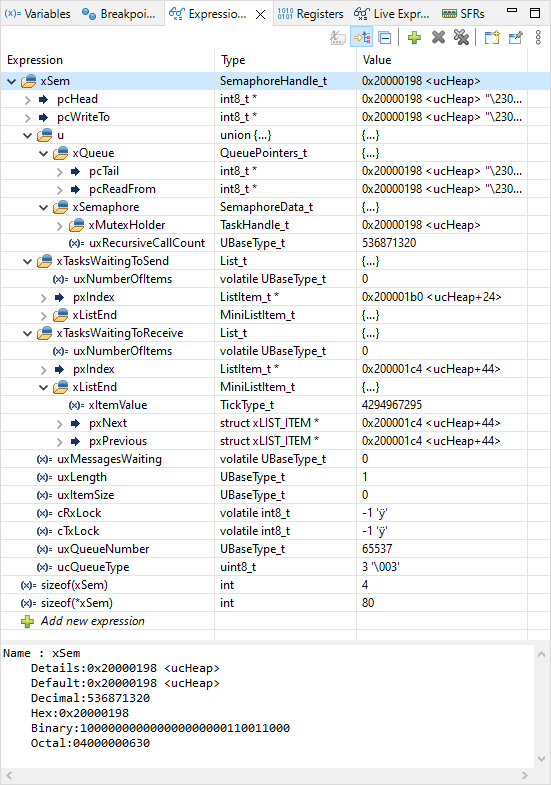
As you can see, the semaphore object is not a simple flag... xSem pointer is 4 bytes long (a 32-bit address), but the semaphore structure that he points to is 80 bytes long. At creation, the xSemaphoreCreateBinary() dynamically allocate these 80 bytes inside the FreeRTOS reserved heap segment. The way the semaphore is working is well beyond the objective of these tutorial. If you dig a little, you'll find out dynamic linked lists... For now, you may just retain that memory-wise, creating a semaphore is not free!
Now, the semaphore object xSem exists, and can be used anywhere in the application. As said before, Task_1 is the one that gives the semaphore every 10 LED toggling:
/*
 *	Task_1 toggles LED every 10ms
 */
void vTask1 (void *pvParameters)
{
	uint16_t	count;
	count = 0;
	while(1)
	{
		BSP_LED_Toggle();
		count++;
		// Release semaphore every 10 count
		if (count == 10)
		{
			xSemaphoreGive(xSem);    // <-- This is where the semaphore is given
			count = 0;
		}
		// Wait
		vTaskDelay(10);
	}
}
And Task_2 is the one that tries to take the semaphore. It displays a console message only when xSem semaphore is available:
/*
* Task_2 sends a message to console when xSem semaphore is given
*/
void vTask2 (void *pvParameters)
{
uint16_t count;
count = 0;
// Take the semaphore once to make sure it is empty
xSemaphoreTake(xSem, 0);
while(1)
{
// Wait for Semaphore endlessly
xSemaphoreTake(xSem, portMAX_DELAY); //<-- This is where the semaphore is taken
// Reaching this point means that semaphore has been taken successfully
// Display console message
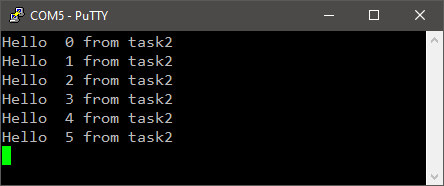
my_printf("Hello %2d from task2\r\n", count);
count++;
}
}
Save ![]() , build
, build ![]() , start a debug session
, start a debug session ![]() and run the program
and run the program ![]() .
.
There are few things worth noting in the above code:
The xSemaphoreTake() function takes two arguments. The first one is the semaphore name, the second one is a timeout. If the task couldn't take the semaphore for that amount of time, it resumes (i.e. execute next lines) whatever. In the example above, the first take attempt (before the loop) is only there to kill xSem semaphore if for any reason it was already given. The timeout is set to zero, therefore the task does not actually waits here if the semaphore was not given.
The second take attempt (inside the loop) sets the timeout to portMAX_DELAY, which you may consider as an infinite wait time. The task will wait here forever if the semaphore is never given.
The semaphore take action tells the scheduler that Task_2 is waiting for the semaphore xSem to be given by some other task. This is therefore an OS-aware waiting mechanism, and we don't need a delay function anymore. The scheduler gives CPU to other tasks while Task_2 waits for xSem.
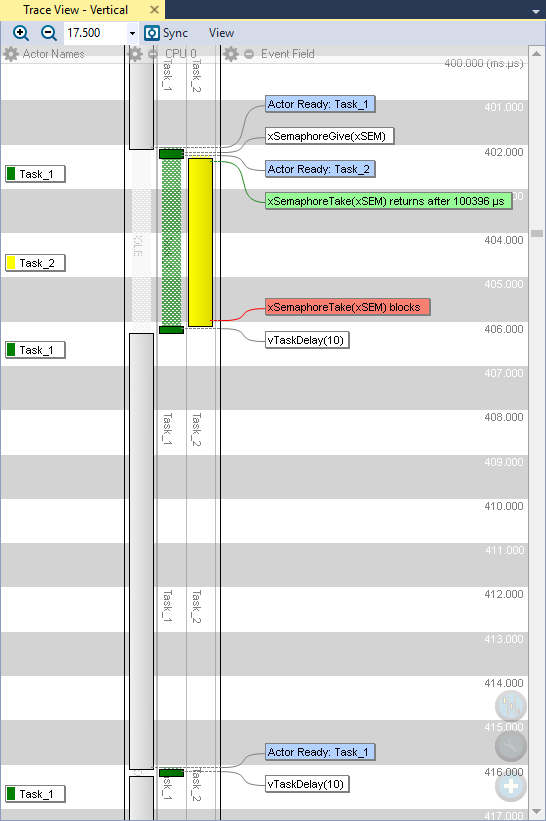
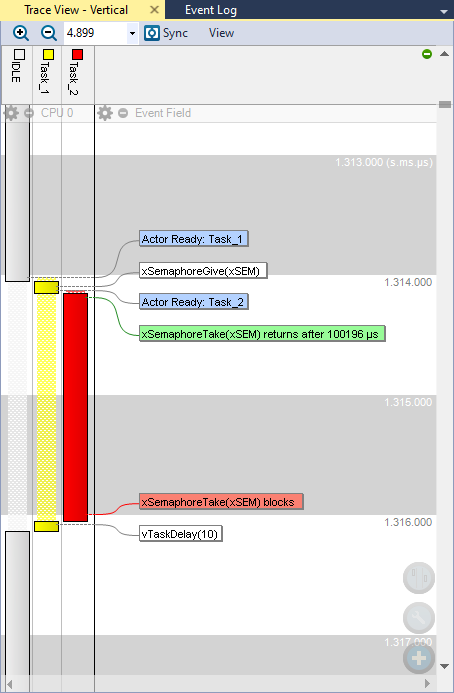
Time to take a look at the resulting trace. The figure below exhibits the expected behavior. Every 10 execution of Task_1, xSem is released (given), triggering Task_2 which displays the console message.
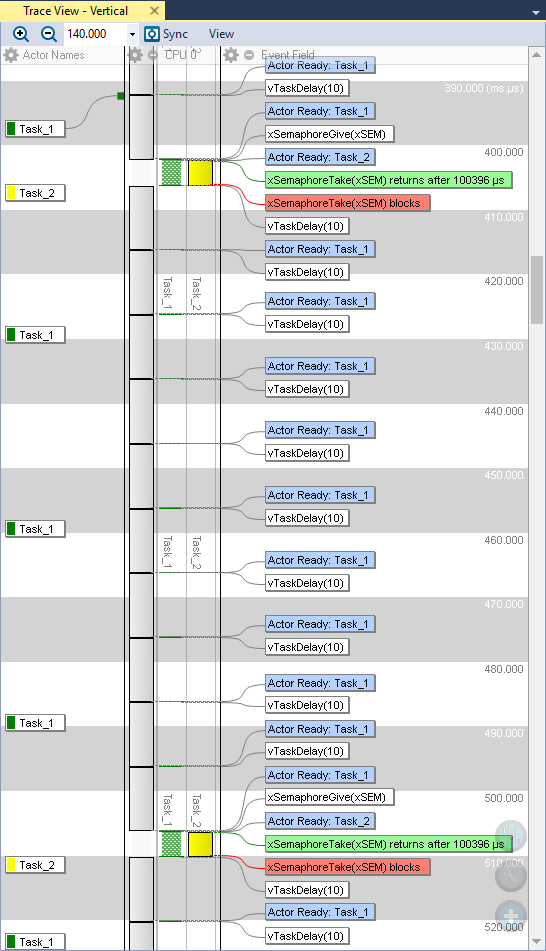
Because Task_2 has higher priority than Task_1, it executes as soon as the semaphore is given. This suspends the execution of Task_1 before it reaches its waiting function. Task_1 only resumes (i.e. reaches its waiting function) after Task_2 is done.
Task_2 starts with a successful semaphore take action (green label), then performs the message sending, then loops and try to take the semaphore again. Since it was already taken once, there is nothing to take anymore, and Task_2 enter the blocked state here (red label), until the next semaphore give action. Task_2 entering the blocked state allows for Task_1 to resume.
 | - - |
2. Return value and timeouts
Most of the time, waiting endlessly for a semaphore is not what you want. In the example above, if for some reason Task_1 does not release the semaphore, Task_2 will never execute. Usually, you want to be able to handle such abnormal situation.
The actual prototype of the xSemaphoreTake() function is given below:
BaseType_t xQueueSemaphoreTake( QueueHandle_t xQueue, TickType_t xTicksToWait )
If you wonder if there's an error in the above function name, the answer is no. xSemaphoreTake() is in fact an alias to the more generic xQueueSemaphoreTake() function. There are two things worth noting:
The second argument xTicksToWait allows for setting a timeout in the waiting function. After a given amount of time, expressed as a number of OS ticks, if the awaited semaphore has not been given, the task should proceed anyway.
The function returns a value of BaseType_t type which is an alias for long int. In practice, the return value is Boolean:
#define pdFALSE     ( ( BaseType_t ) 0 )
        #define pdTRUE      ( ( BaseType_t ) 1 )
        #define pdFAIL      ( pdFALSE )
        #define pdPASS      ( pdTRUE )
- If the function returns 1 (i.e., pdTRUE or pdPASS), it means that the semaphore was taken successfully before the timeout elapsed.
- If the function returns 0 (i.e., pdFALSE or pdFAIL), it means the the sandglass (timeout) has reached the end before any semaphore was taken.
To illustrate this idea, let us change a bit our code so that:
Task_1 only perform the LED toggling and count increment when the user button (the blue one) is released. In other words, we can stop LED toggling by pressing the user button.
Task_2 tries to take the semaphore. But if nothing is coming within a 2 seconds delay, then it displays an alert message.
/*
 * main.c
 *
 *  Created on: 24/02/2018
 *      Author: Laurent
 */
#include "main.h"
// Static functions
static void SystemClock_Config	(void);
// FreeRTOS tasks
void vTask1 	(void *pvParameters);
void vTask2 	(void *pvParameters);
// Kernel objects
xSemaphoreHandle xSem;
// Main program
int main()
{
	// Configure System Clock
	SystemClock_Config();
	// Initialize LED pin
	BSP_LED_Init();
	// Initialize the user Push-Button
	BSP_PB_Init();
	// Initialize Debug Console
	BSP_Console_Init();
	// Start Trace Recording
	vTraceEnable(TRC_START);
	// Create Semaphore object (this is not a 'give')
	xSem = xSemaphoreCreateBinary();
	// Give a nice name to the Semaphore in the trace recorder
	vTraceSetSemaphoreName(xSem, "xSEM");
	// Create Tasks
	xTaskCreate(vTask1, "Task_1", 256, NULL, 1, NULL);
	xTaskCreate(vTask2, "Task_2", 256, NULL, 2, NULL);
	// Start the Scheduler
	vTaskStartScheduler();
	while(1)
	{
		// The program should never be here...
	}
}
/*
 *	Task_1 toggles LED every 10ms
 */
void vTask1 (void *pvParameters)
{
	uint16_t	count;
	count = 0;
	while(1)
	{
		// Toggle LED only if button released
		if (BSP_PB_GetState()==0)
		{
			BSP_LED_Toggle();
			count++;
		}
		// Release semaphore every 10 count
		if (count == 10)
		{
			xSemaphoreGive(xSem);
			count = 0;
		}
		// Wait here for 10ms since last wakeup
		vTaskDelay(10);
	}
}
/*
 *	Task_2 sends a message to console when xSem semaphore is given
 */
void vTask2 (void *pvParameters)
{
	portBASE_TYPE   xStatus;
	uint16_t        count;
	count = 0;
	// Take the semaphore once to make sure it is empty
	xSemaphoreTake(xSem, 0);
	while(1)
	{
		// Wait here for Semaphore with 2s timeout
		xStatus = xSemaphoreTake(xSem, 2000);
		// Test the result of the take attempt
		if (xStatus == pdPASS)
		{
			// The semaphore was taken as expected
			// Display console message
			my_printf("Hello %2d from task2\r\n", count);
			count++;
		}
		else
		{
			// The 2s timeout elapsed without Semaphore being taken
			// Display another message
			my_printf("Hey! Where is my semaphore?\r\n");
		}
	}
}
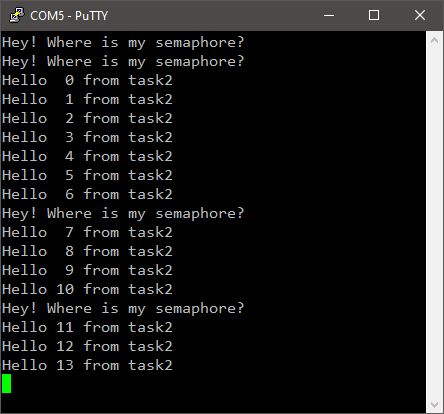
Watch the console window while playing with the user push-button:
Catching both cases of semaphore taking attempts in the trace recorder is a little tricky because the 2s timeout is larger than the recorder capacity (limited by the small amount of RAM we have).
You'll need to turn the snapshot mode to circular buffer. In this mode, you'll get the n last seconds of program execution (instead of the n first seconds when using the stop-when-full recording mode).
/**
 * @def TRC_CFG_SNAPSHOT_MODE
 * @brief Macro which should be defined as one of:
 * - TRC_SNAPSHOT_MODE_RING_BUFFER
 * - TRC_SNAPSHOT_MODE_STOP_WHEN_FULL
 * Default is TRC_SNAPSHOT_MODE_RING_BUFFER.
 *
 * With TRC_CFG_SNAPSHOT_MODE set to TRC_SNAPSHOT_MODE_RING_BUFFER, the
 * events are stored in a ring buffer, i.e., where the oldest events are
 * overwritten when the buffer becomes full. This allows you to get the last
 * events leading up to an interesting state, e.g., an error, without having
 * to store the whole run since startup.
 *
 * When TRC_CFG_SNAPSHOT_MODE is TRC_SNAPSHOT_MODE_STOP_WHEN_FULL, the
 * recording is stopped when the buffer becomes full. This is useful for
 * recording events following a specific state, e.g., the startup sequence.
 */
#define TRC_CFG_SNAPSHOT_MODE TRC_SNAPSHOT_MODE_RING_BUFFER
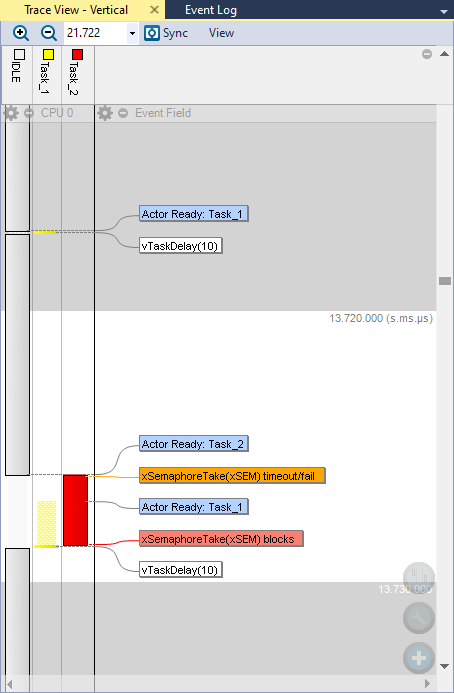
Below is the usual case of successful semaphore taking from Task_2, right after Task_1 releases it:
And now, this is what happen when the semaphore was not available for more than 2 seconds:
If you have Tracealyzer opened, try this: Views→Communication Flow
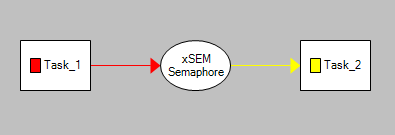
Yes, Tracealyzer is able to construct this graph based on what's in the recorder data. Isn't that wonderful? Imagine this on more complex projects.
| - - |
4. Summary
In this tutorial, you have learned how to implement a basic synchronization mechanism between two tasks using a binary semaphore.
- Log in to post comments