
1. First FreeRTOS project
FreeRTOS tutorials have been tested and illustrated using STM32CubeIDE. You may refer to above tutorials for more details on installing and using this IDE.
![]()

1. The foundation : A clean bare-metal working project
Our starting point is a simple, clean and basic STM32 project. Basically we need CMSIS files, a clock configuration function for a 48MHz operation, and a minimal set of BSP functions for working with LED, Push-Button, and debug console (printf). We neither need interrupts nor DMA initializations here.
In order to setup such a starting project, you may either :
- Highly recommended: Start a new project named 'nucleo_64_F072_FreeRTOS'
- Follow instructions from 1.7. Hello World #4, changing 'blink3' to 'nucleo_64_F072_FreeRTOS'
- Then add the clock configuration as explained in 1.8. Clock settings
- Then add the LED and Push-Button drivers from 2.1. GPIOs
- Then add the UART driver and my_printf() functions from 2.2. UART & printf()
- Moderately recommended: Start from a copy of the 'blink3' project (if you already have it from previous 1.7. Hello World #4 and 1.8. Clock settings)
- Refer to the 1.9. Importing & Cloning projects tutorial to make a copy of the 'blink3' project into a new project named 'nucleo_64_F072_FreeRTOS'
- Then add the LED and Push-Button drivers from 2.1. GPIOs
- Then add UART driver and my_printf() functions from 2.2. UART & printf()
- Not quite recommended: Start from a copy of the 'my-project' project from the previous tutorial program
- Refer to the 1.9. Importing & Cloning projects tutorial to make a copy of the 'my_project' project into a new project named 'nucleo_64_F072_FreeRTOS'
- Then carefully clean (i.e. delete code) this copy from everything (including interrupt handlers) but some basic BSP functions for LED, Push-Button, UART and printf() control.
In any case, make sure that all references to previous Git repositories (either local or remote) are removed. If necessary, use the disconnect ![]() function and delete .git local folder. You'll have to start a fresh local repository and to configure a new remote for these tutorials.
function and delete .git local folder. You'll have to start a fresh local repository and to configure a new remote for these tutorials.
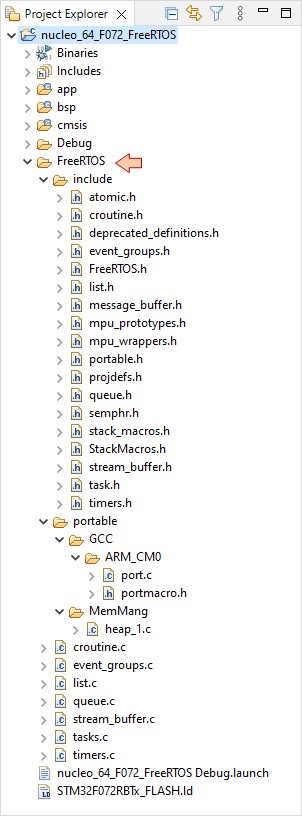
Your project structure should be similar to this:

From the STM32 tutorials section, the BSP functions we keep as a start are simply:
/*
 * bsp.h
 *
 *  Created on: 24 mai 2021
 *      Author: Laurent
 */
#ifndef INC_BSP_H_
#define INC_BSP_H_
#include "stm32f0xx.h"
/*
 * LED driver functions
 */
void        BSP_LED_Init       (void);
void        BSP_LED_On         (void);
void        BSP_LED_Off        (void);
void        BSP_LED_Toggle     (void);
/*
 * Push-Button driver functions
 */
void        BSP_PB_Init        (void);
uint8_t     BSP_PB_GetState    (void);
/*
 * Debug Console init
 */
void        BSP_Console_Init   (void);    // Simple, with no DMA on RX channel
#endif /* INC_BSP_H_ */
As a test, use the following main() function:
// Main function
int main()
{
	uint32_t	i;
	// Configure clock for 48MHz operation
	SystemClock_Config();
	// Initialize LED and User button
	BSP_LED_Init();
	BSP_PB_Init();
	// Initialize Console
	BSP_Console_Init();
	my_printf("Console Ready!\r\n");
	my_printf("SYSCLK = %d\r\n", SystemCoreClock);
	while(1)
	{
		// LED toggle
		BSP_LED_Toggle();
		// User-Button test
		if(BSP_PB_GetState() == 1)
		{
			my_printf("#");
		}
		// Wait
		for(i=0; i<1000000; i++);
	}
}
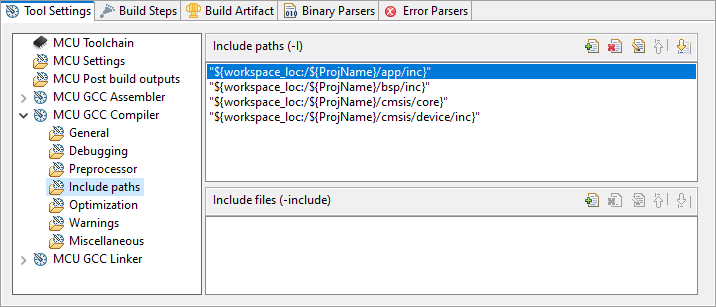
Review the build configuration to make sure that everything is correctly set. You may for instance check for include paths:
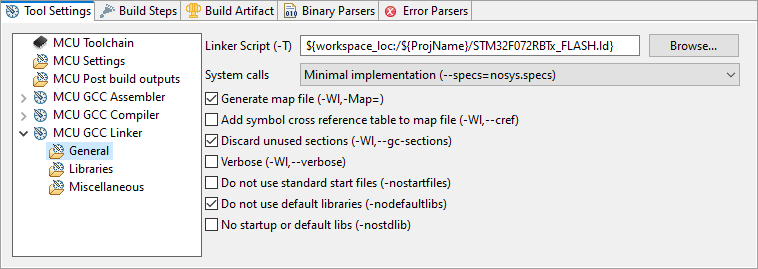
The linker script path, and linker options:
Then build ![]() the project and repair any error or warning you'll have first time (unless you're very good). What we need is a perfectly clean base for further FreeRTOS integration:
the project and repair any error or warning you'll have first time (unless you're very good). What we need is a perfectly clean base for further FreeRTOS integration:
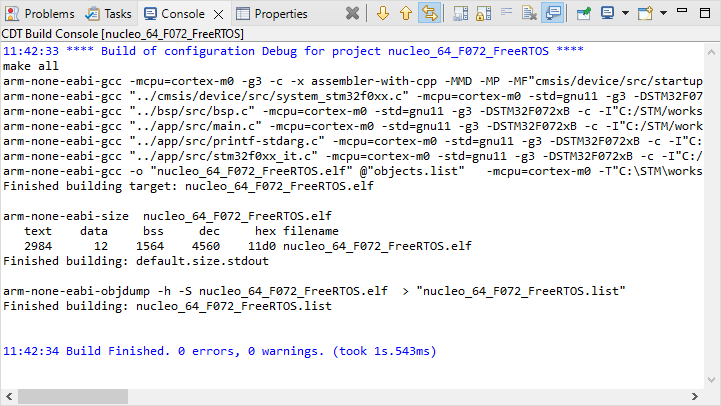
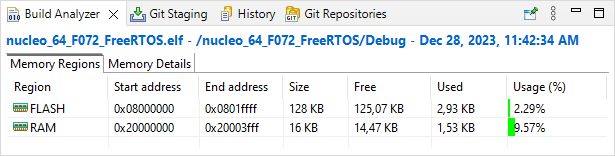
You may also take a look at the memory footprint:
Next, if not done yet, create a debug configuration:
Now you should be ready to launch the debug ![]() session. Using the Expressions view, make sure that SystemCoreClock global variable switches from 8MHz to 48MHz when stepping over
session. Using the Expressions view, make sure that SystemCoreClock global variable switches from 8MHz to 48MHz when stepping over ![]() the SystemClock_Config() function.
the SystemClock_Config() function.
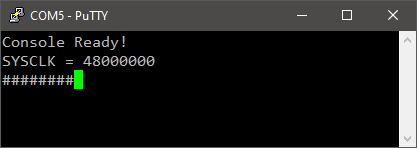
Open a console application (e.g. Putty) with correct COM port settings and then run ![]() the program. You should get the famous blinking LED, with some '#' being printed when the user button is held down. Well done!
the program. You should get the famous blinking LED, with some '#' being printed when the user button is held down. Well done!

Repeating steps from tutorial 1.10. Git and GitLab, create a local repository for this tutorial, and configure the remote repository according to teacher instructions.
 | - - |
2. Getting FreeRTOS into the project
2.1. Adding FreeRTOS source code
At the time of writing this tutorial, latest complete FreeRTOS distribution available is with kernel 10.5.1 (release 202212.01). Get the FreeRTOS source archive from the web (https://www.freertos.org), or school repository and copy it somewhere safe on your computer.
WARNING : If you are new to FreeRTOS (I guess you are, if you're here), I strongly suggest that you stick with the FreeRTOS version that I'm using here, even through it is not "the very last one". First, that is the only way to make sure that provided instructions will work out of the box. New versions are frequently released, and it an impossible mission to keep in sync. Second, I doubt that newer versions will bring any extra feature that you will be able to appreciate. Actually, we could run through these tutorials using a 5-years old FreeRTOS version just the same...
If despite this warning you choose to go with a newer version of FreeRTOS, you may succeed but it is up to you to adapt. This requires a good understanding of what we do.
Unzip the downloaded archive and locate the Source\ folder:
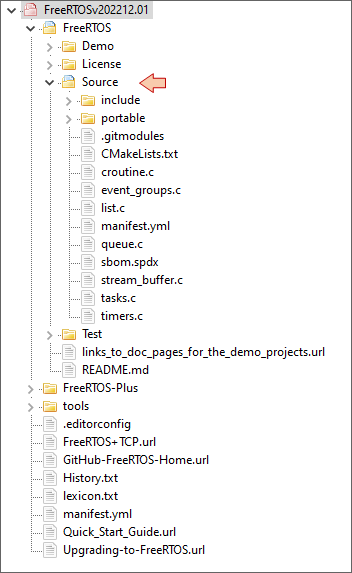
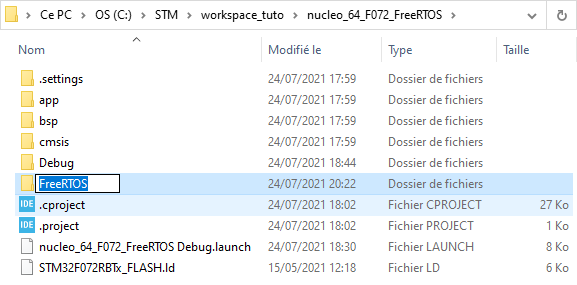
Using Windows file navigator, Copy and Paste the Source\ folder into your project directory, beside app\, bsp\ and cmis\ folders. Then rename it 'FreeRTOS\'.
At this step, you need to understand that FreeRTOS source files are provided with support for a lot of different MCUs and toolchains. Therefore, the first thing to do is some housekeeping to only retain relevant source files in our context: STM32F072 (ARM Cortex-M0 CPU) with gcc toolchain.
In the FreeRTOS\portable\ folder, delete all files and folders except the two folders:
GCC\
MemMang\
In the FreeRTOS\portable\MemMang\ directory, delete all files except the file:
heap_1.c
In the FreeRTOS\portable\GCC\ directory, delete all files and folders except the folder:
ARM_CM0\
Delete stdint.readme from FreeRTOS\include\ folder.
Only keep C-source files (*.c) in the FreeRTOS\ folder.
Once you're done with all this cleaning, your project explorer should look like this:
You may notice that FreeRTOS\ folder does not appear as a source folder. This is because it was copied using Windows file explorer. That's a problem because if we don't repair this, all the source files below that folder are not involved into the build process.

Open the project properties, and select the C/C++ General→Path and Symbols category, then select the Source Location tab. Using the Add Folder... button, add the \FreeRTOS folder to the folder source list, then Apply and Close.
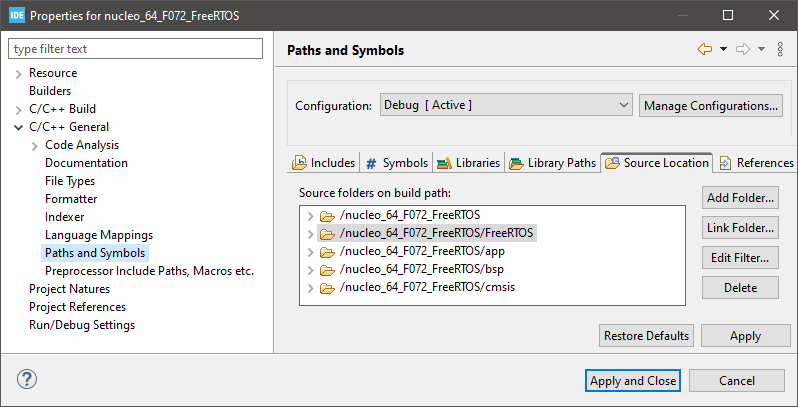
Make sure that the \FreeRTOS folder is now tagged as a source folder:

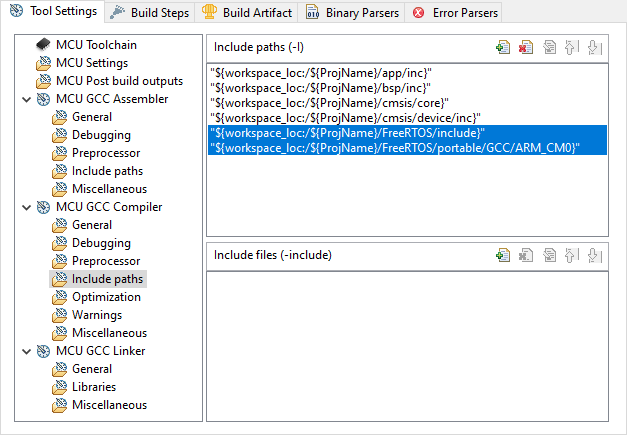
Add the two new header paths into your build settings and apply changes.
2.2. FreeRTOS configuration
If you try and build ![]() the project now, you'll see that something is missing. A FreeRTOS instance must be configured by means of a main configuration header that permits to tune the kernel to your needs. That is where you can customize FreeRTOS for your target, for your toolchain, and finally switch (on/off) kernel features. The main idea is that you can turn off features you don't need to save memory and improve performance.
the project now, you'll see that something is missing. A FreeRTOS instance must be configured by means of a main configuration header that permits to tune the kernel to your needs. That is where you can customize FreeRTOS for your target, for your toolchain, and finally switch (on/off) kernel features. The main idea is that you can turn off features you don't need to save memory and improve performance.
Because this header is under your responsibility, and can be edited upon your needs, it is not provided together with FreeRTOS sources. Yet, several examples can be found in the /Demo folder of the downloaded archive and you can find detailed documentation of every options here : https://www.freertos.org/a00110.html. If you are new to FreeRTOS, chance is that these settings will not make any sense to you. After some practice, you will be able to understand most of them.
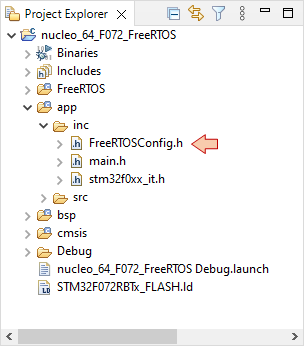
Using the Project Explorer, create a new header file FreeRTOSConfig.h under /app/inc:
Replace the full content of your FreeRTOSConfig.h with the following:
/*
 * FreeRTOS V202212.01
 * Copyright (C) 2020 Amazon.com, Inc. or its affiliates.  All Rights Reserved.
 *
 * Permission is hereby granted, free of charge, to any person obtaining a copy of
 * this software and associated documentation files (the "Software"), to deal in
 * the Software without restriction, including without limitation the rights to
 * use, copy, modify, merge, publish, distribute, sublicense, and/or sell copies of
 * the Software, and to permit persons to whom the Software is furnished to do so,
 * subject to the following conditions:
 *
 * The above copyright notice and this permission notice shall be included in all
 * copies or substantial portions of the Software.
 *
 * THE SOFTWARE IS PROVIDED "AS IS", WITHOUT WARRANTY OF ANY KIND, EXPRESS OR
 * IMPLIED, INCLUDING BUT NOT LIMITED TO THE WARRANTIES OF MERCHANTABILITY, FITNESS
 * FOR A PARTICULAR PURPOSE AND NONINFRINGEMENT. IN NO EVENT SHALL THE AUTHORS OR
 * COPYRIGHT HOLDERS BE LIABLE FOR ANY CLAIM, DAMAGES OR OTHER LIABILITY, WHETHER
 * IN AN ACTION OF CONTRACT, TORT OR OTHERWISE, ARISING FROM, OUT OF OR IN
 * CONNECTION WITH THE SOFTWARE OR THE USE OR OTHER DEALINGS IN THE SOFTWARE.
 *
 * https://www.FreeRTOS.org
 * https://github.com/FreeRTOS
 *
 */
#ifndef FREERTOS_CONFIG_H
#define FREERTOS_CONFIG_H
/*
 * Here is a good place to include header files that are
 * required across your application.
 */
#include "stm32f0xx.h"
extern uint32_t    SystemCoreClock;
#define configUSE_PREEMPTION                        1
#define configUSE_TICKLESS_IDLE                     0
#define configCPU_CLOCK_HZ                          ( SystemCoreClock )
#define configTICK_RATE_HZ                          ( ( TickType_t ) 1000 )
#define configMAX_PRIORITIES                        5
#define configMINIMAL_STACK_SIZE                    ( ( uint16_t ) 128 )
#define configMAX_TASK_NAME_LEN                     16
#define configUSE_16_BIT_TICKS                      0
#define configIDLE_SHOULD_YIELD                     1
#define configUSE_TASK_NOTIFICATIONS                1
#define configTASK_NOTIFICATION_ARRAY_ENTRIES       1
#define configUSE_MUTEXES                           0
#define configUSE_RECURSIVE_MUTEXES                 0
#define configUSE_COUNTING_SEMAPHORES               0
#define configQUEUE_REGISTRY_SIZE                   10
#define configUSE_QUEUE_SETS                        0
#define configUSE_TIME_SLICING                      0
#define configSTACK_DEPTH_TYPE                      uint16_t
#define configMESSAGE_BUFFER_LENGTH_TYPE            size_t
#define configHEAP_CLEAR_MEMORY_ON_FREE             1
/* Memory allocation related definitions. */
#define configSUPPORT_STATIC_ALLOCATION             0
#define configSUPPORT_DYNAMIC_ALLOCATION            1
#define configKERNEL_PROVIDED_STATIC_MEMORY         0
#define configTOTAL_HEAP_SIZE                       ( ( size_t ) 6 * 1024 )
#define configAPPLICATION_ALLOCATED_HEAP            0
#define configSTACK_ALLOCATION_FROM_SEPARATE_HEAP   0
#define configENABLE_HEAP_PROTECTOR                 0
/* Hook function related definitions. */
#define configUSE_IDLE_HOOK                         0
#define configUSE_TICK_HOOK                         0
#define configCHECK_FOR_STACK_OVERFLOW              0
#define configUSE_MALLOC_FAILED_HOOK                0
#define configUSE_DAEMON_TASK_STARTUP_HOOK          0
#define configUSE_SB_COMPLETED_CALLBACK             0
/* Run time and task stats gathering related definitions. */
#define configGENERATE_RUN_TIME_STATS               0
#define configUSE_TRACE_FACILITY                    0
#define configUSE_STATS_FORMATTING_FUNCTIONS        0
/* Co-routine related definitions. */
#define configUSE_CO_ROUTINES                       0
#define configMAX_CO_ROUTINE_PRIORITIES             1
/* Software timer related definitions. */
#define configUSE_TIMERS                            1
#define configTIMER_TASK_PRIORITY                   3
#define configTIMER_QUEUE_LENGTH                    10
#define configTIMER_TASK_STACK_DEPTH                configMINIMAL_STACK_SIZE
/* Interrupt nesting behavior configuration. */
#define configMAX_API_CALL_INTERRUPT_PRIORITY       5
/* Define to trap errors during development. */
#define configASSERT(x) if( ( x ) == 0 ) { taskDISABLE_INTERRUPTS(); for( ;; ); }
// #define configASSERT(x) if( ( x ) == 0 ) vAssertCalled( __FILE__, __LINE__ )
/* Optional functions - most linkers will remove unused functions anyway. */
#define INCLUDE_vTaskPrioritySet                    0
#define INCLUDE_uxTaskPriorityGet                   0
#define INCLUDE_vTaskDelete                         0
#define INCLUDE_vTaskSuspend                        0
#define INCLUDE_xResumeFromISR                      0
#define INCLUDE_vTaskDelayUntil                     1
#define INCLUDE_vTaskDelay                          1
#define INCLUDE_xTaskGetSchedulerState              0
#define INCLUDE_xTaskGetCurrentTaskHandle           1
#define INCLUDE_uxTaskGetStackHighWaterMark         0
#define INCLUDE_uxTaskGetStackHighWaterMark2        0
#define INCLUDE_xTaskGetIdleTaskHandle              0
#define INCLUDE_eTaskGetState                       0
#define INCLUDE_xEventGroupSetBitFromISR            1
#define INCLUDE_xTimerPendFunctionCall              0
#define INCLUDE_xTaskAbortDelay                     0
#define INCLUDE_xTaskGetHandle                      0
#define INCLUDE_xTaskResumeFromISR                  0
/*
 * Definitions that map the FreeRTOS port interrupt handlers
 * to their CMSIS standard names
 */
#define vPortSVCHandler                             SVC_Handler
#define xPortPendSVHandler                          PendSV_Handler
#define xPortSysTickHandler                         SysTick_Handler
/* A header file that defines trace macro can be included here. */
#endif /* FREERTOS_CONFIG_H */
Finally, open stm32f0xx_it.c and comment the 3 interrupt handlers implementations, as FreeRTOS needs its own definition of these:
SVC_Handler()
PendSV_Handler()
SysTick_Handler()
/**
  * @brief  This function handles SVCall exception.
  * @param  None
  * @retval None
  */
//void SVC_Handler(void)
//{
//}
/**
  * @brief  This function handles PendSVC exception.
  * @param  None
  * @retval None
  */
//void PendSV_Handler(void)
//{
//}
/**
  * @brief  This function handles SysTick Handler.
  * @param  None
  * @retval None
  */
//void SysTick_Handler(void)
//{
//  // HAL_IncTick();
//}
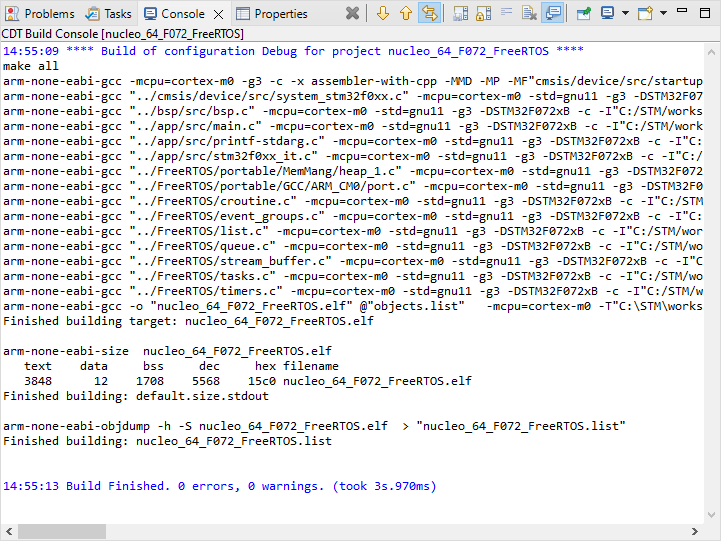
Save all the project files ![]() , clean the project and rebuild all
, clean the project and rebuild all ![]() . Hopefully, you'll get a clean build report with no error or warnings:
. Hopefully, you'll get a clean build report with no error or warnings:
3. Your first FreeRTOS application
Let-us first include FreeRTOS headers into the project. We will take this opportunity to regroup all the headers in main.h as follows:
/*
 * main.h
 *
 *  Created on: 15 mai 2021
 *      Author: Laurent
 */
#ifndef INC_MAIN_H_
#define INC_MAIN_H_
// Device header
#include "stm32f0xx.h"
// BSP functions
#include "bsp.h"
// FreeRTOS headers
#include "FreeRTOSConfig.h"
#include "FreeRTOS.h"
#include "task.h"
#include "timers.h"
#include "semphr.h"
#include "queue.h"
#include "event_groups.h"
#include "stream_buffer.h"
// Global functions
int my_printf	(const char *format, ...);
int my_sprintf	(char *out, const char *format, ...);
#endif /* INC_MAIN_H_ */
Doing so, you just have to include main.h in main.c and all the required functions will be available:
/*
 * main.c
 *
 *  Created on: 24/02/2018
 *      Author: Laurent
 */
#include "main.h"
// Static functions
static void SystemClock_Config	(void);
...
Next, still in main.c, let us prototype two global functions that we will use for the implementation of two so-called tasks in the RTOS vocabulary:
// FreeRTOS tasks
void vTask1 	(void *pvParameters);
void vTask2 	(void *pvParameters);
And now, let us write the main() function which basically:
Performs MCU init, including clock settings and some low-level peripheral configurations
Create tasks as OS kernel objects, providing a name, a given amount of RAM and a priority level
Start the OS scheduler
// Main function
int main()
{
	// Configure System Clock
	SystemClock_Config();
	// Initialize LED pin
	BSP_LED_Init();
	// Initialize Debug Console
	BSP_Console_Init();
	// Create Tasks
	xTaskCreate(vTask1, "Task_1", 256, NULL, 1, NULL);
	xTaskCreate(vTask2, "Task_2", 256, NULL, 2, NULL);
	// Start the Scheduler
	vTaskStartScheduler();
	while(1)
	{
		// The program should never be here...
	}
}
First, let have a word regarding the xTaskCreate() function. The prototype is as follows:
BaseType_t xTaskCreate ( TaskFunction_t               pxTaskCode,
                         const char * const           pcName,
                         const configSTACK_DEPTH_TYPE usStackDepth,
                         void * const                 pvParameters,
                         UBaseType_t                  uxPriority,
                         TaskHandle_t * const         pxCreatedTask );
So that calling:
xTaskCreate(vTask1, "Task_1", 256, NULL, 1, NULL);creates a data structure for a task called "Task_1", with 256-words of associated stack memory and a priority level of 1. With FreeRTOS, the higher the priority level, the higher the priority. That's simple! Don't get confused with Cortex-M interrupt priority levels which works this other way around (the lower the index, the higher the priority).
In a common FreeRTOS application, the vTaskStartScheduler() function never returns. It starts the OS scheduler that manages tasks execution. Any code below this function call will never execute if everything goes well. The while(1) loop is placed here to catch abnormal behavior in the debugger. If you get there, there's something wrong...
Last thing, we need an implementation code for each task. In this very first example, vTask1() simply toggles the LED every 300ms, while vTask2() outputs a console message every 1s. For simplicity, you can put the following implementation right below the main() function within main.c:
/*
 *	Task1 toggles LED every 300ms
 */
void vTask1 (void *pvParameters)
{
	while(1)
	{
		BSP_LED_Toggle();
		vTaskDelay(300);
	}
}
/*
 *	Task2 sends a message to console every 1s
 */
void vTask2 (void *pvParameters)
{
	uint16_t count;
	count = 0;
	while(1)
	{
		my_printf("Hello %2d from task2\r\n", count);
		count++;
		vTaskDelay(1000);
	}
}
Save all ![]() and rebuild
and rebuild ![]() the project. You should have no error or warning. Open a Putty serial session using correct COM number and baudrate. Then run
the project. You should have no error or warning. Open a Putty serial session using correct COM number and baudrate. Then run ![]() the program.
the program.
You should see both the LED blinking, and the console displaying:
 | 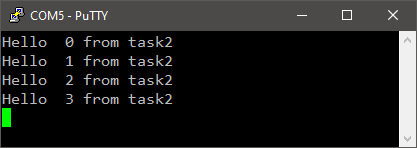 |
vTask1() | vTask2() |
Congratulations, you've got your first FreeRTOS multi-tasking application up and running!
Note that vTask1() and vTask2() have two things in common, that you may consider as primary rules, working in most cases, for ANY task placed under RTOS control:
Both are implemented just like a small main() function with :
local variables declaration
variables and peripherals initializations
a while(1) never ending loop, that actually performs the desired task operations
Inside of the never ending loop, there MUST BE a waiting mechanism. This is something telling the scheduler that the task is not busy for a while. If it's not there, other tasks of lower priority level will never run. That's the purpose of the vTaskDelay() function. We will see later that many other waiting mechanisms may be involved.
| - - |
4. Debrief
In this tutorial, you have learned how to create a FreeRTOS template project, and wrote two very simple tasks to verify that everything is actually working as expected.
There are few things here that can be a little confusing for the beginner:
We wrote two functions, but we didn't write any call to these functions... So what's calling them?
As mentioned earlier, each of these functions is written like a little main() function, including variables declaration, perhaps some initializations, and most importantly an infinite loop... So how is it possible to have functions that never returns? How come the application is not trapped in one of these?
The two functions seem to run in parallel... But wait a second... our chip is not multi-core! We only have one CPU, so how can that be? And what's the meaning of "multi-tasking" anyway when we have only one CPU?
These questions are very legitimate. I'll try to provide some answers:
Yes, we have only one CPU, so at any moment only one the these function can be running. In the meantime, the other tasks (functions) are somehow "paused".
There are only two possible reasons for a task to be in that "paused" state:
It can be blocked, waiting for "something" to happen before it can resume. That "something" can be a delay to wait for (that was the case is this tutorial), or an external event coming either form the hardware (e.g., interrupts) or from other tasks.
It can be ready. In that case, the task is not waiting for any event, and is willing to run. But the CPU is now running another task of higher priority level. So our paused task waits for the CPU to become available.
In summary, at any time, a task is in one among 3 possible states:

The task is RUNNING 
The task is BLOCKED 
The task is READY It is really important to understand this for what's coming next. Note that FreeRTOS defines two other states (Suspended and Deleted), but we will not cover the dynamic creation/suspension/deletion of tasks in these tutorials.
The Scheduler is in charge of the CPU distribution. The Scheduler evaluates the situation periodically and allows the ready task of higher priority to execute. Therefore, it is the Scheduler that "calls" and "pauses" the task functions, although "calling" is not the appropriate word here but you get the idea.
When all the user tasks are in the Blocked state, the Scheduler runs an IDLE task that does nothing. As you'll soon see, this is what the CPU is doing (i.e., nothing) most of the time in the examples we will study.
- Log in to post comments