
3.1. External interrupts
1. Introduction
This chapter deals with the management of events. An event is a logical signal you expect from a source. The source can be external to the MCU or internal (peripheral). It can relate to a user action on a button, it can be UART signaling an incoming byte, it can be ADC stating the end of a conversion, it can be a timer update event, or many more. There are several ways you can deal with such signals. “Polling” an event is when you write a software conditional statement (if, while, until) to repeatedly check whether it occurred or not. Since polling keeps the CPU busy while waiting for the event, you can rely on other mechanisms to deal with external or internal signals: interrupts, trigger signals or DMA requests.
2. Event Polling
As an introduction, let us recall what polling is about. In this scenario, the main loop is supposed to repeatedly perform an important task while reacting to the user action on the button.
We’re going to use the debug console to illustrate the application behavior:
The fictive "important task" is illustrated by printing a ‘.’ followed by a delay which represent the time required to perform that task
The user action on the button is illustrated by printing a ‘#’
The button release is illustrated by printing a ‘|’.
2.1. What doesn’t work
/*
 * main.c
 *
 *  Created on: 5 août 2017
 *      Author: Laurent
 */

#include "stm32f0xx.h"
#include "bsp.h"
#include "delay.h"
#include "main.h"

// Static functions
static void SystemClock_Config(void);

// Main function
int main()
{
	// Configure System Clock
	SystemClock_Config();

	// Initialize Button pin
	BSP_PB_Init();

	// Initialize Console
	BSP_Console_Init();
	my_printf("Console Ready!\r\n");

	// Initialize Timer Delay
	BSP_DELAY_TIM_init();

	// Main loop
	while(1)
	{
		// Process button if pushed down
		if (BSP_PB_GetState() == 1)
		{
			my_printf("#");
		}

		// Some important stuff to do
		my_printf(".");
		BSP_DELAY_TIM_ms(200);
	}
}
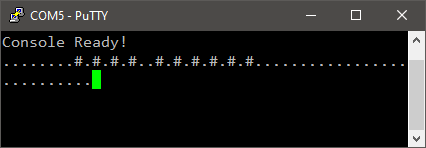
In the above code, the task associated to the button action will be executed repeatedly as long as the user keep the button low:
You would rather want the task associated to the button to be executed only once, each time the button is pressed. For that, we need to keep track of the button state. You can implement either blocking or non-blocking code.
2.2. Blocking example
	// Main loop
	while(1)
	{
		// Wait here until button is released
		while (BSP_PB_GetState() != 0);
		my_printf ("|");

		// Wait here until button is pressed
		while (BSP_PB_GetState() != 1);
		my_printf("#");

		// Some important stuff to do
		my_printf(".");
		BSP_DELAY_TIM_ms(200);
	}
In this example, we have two blocking conditions (‘while’ statements). The program loops on these lines until the button reaches the expected state. The CPU is therefore 100% busy on reading the pin state and cannot perform anything else while waiting for user inputs. The important job is done only once, after the button has been fully cycled.
Check the terminal while playing with the button:
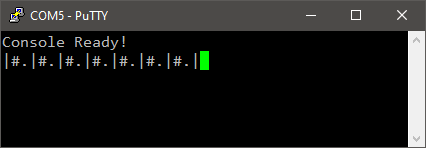
Polling for an event in a blocking statement is a very dangerous practice: if for some reason the event never occurs, the application hangs there. From the user experience, it looks like a crash that requires a reset to recover.
The least you can do is to implement a timeout condition so that an exit is possible if the event is not happening within an acceptable delay. The code below is a recommended practice when waiting for a peripheral flag. If the timeout expires, the function should return with an error code.
// Blocking condition with timeout
timeout 1000000;
while( (my_expected_event != true) && (timeout > 0) ) timeout--;

if (timeout == 0)
{
	// Event did not occur -> Return with error code
}

// Event occurred, keep going

...
2.3. Non-Blocking example
Sometimes, blocking condition is not what you want. Working with “if” statement instead of “while” works. You need a way to store the current button state in order to avoid repeating the same action again and again while the button state doesn’t change:
// Main function
int main()
{
	uint8_t	button_state;

	...

	// Main loop
	while(1)
	{
		// If button is pushed down
		if (BSP_PB_GetState() == 1)
		{
			// And not yet processed
			if (button_state == 0)
			{
				my_printf("#");
				button_state = 1;
			}
		}

		// If button is released
		else button_state = 0;

		// Some important stuff to do
		my_printf(".");
		BSP_DELAY_TIM_ms(200);
	}
}
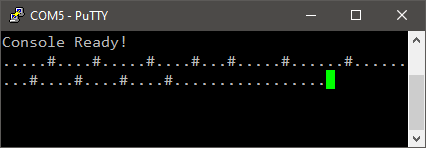
This is working as expected:
In such situation, a little state machine making use of a state variable and a “switch case” statement does the job pretty well also. Besides, code execution is same as above:
...
	// Initialize Button State
	button_state = 0;

	// Main loop
	while(1)
	{
    	switch (button_state)
    	{
    		case 0:		// Button is currently released
    		{
    			// If pressed
    			if (BSP_PB_GetState() == 1)
    			{
    				my_printf ("#");
    				button_state = 1;
    			}
    			break;
    		}

    		case 1:		// Button is currently pressed
    		{
    			// If released
    			if (BSP_PB_GetState() == 0)
    			{
    				button_state = 0;
    			}
    			break;
    		}
    	}

		// Some important stuff to do
		my_printf(".");
		BSP_DELAY_TIM_ms(200);
	}
...
Note that ‘#’ is only printed when the button is kept low AFTER the important stuff completed. Try with a longer delay (1s or more) and you will feel a lack of responsiveness in the button action.
2.4. Discussion
Polling (i.e. software testing) events is perfectly valid but you need to be aware of three main drawbacks:
You spend CPU time checking if the event occurred (i.e. reading a peripheral register) regardless if the event actually occurred or not.
You may react to the event manifestation a long time after it really occurred because the CPU is not always scanning the input and can be busy with other tasks.
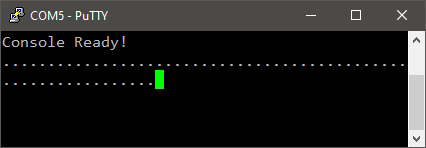
You may ever miss events. You can easily illustrate this point by quickly tapping the button with our actual code running. You will see that the console does not report quick taps unless you’re lucky...
There is an hardware mechanism, that catches an event as soon as it occurs, while leaving the CPU free to perform other tasks. It is called an “interruption”.
 | - - |
3. Working with interruptions
An interruption is a hardware mechanism that automatically suspends the current function being executed in order to perform a dedicated task (another function) as soon as an event occurs. When this dedicated task returns, the program resumes exactly where it was suspended.
Most of the time, what we call an “event” comes from a hardware peripheral. It can be a change on input pin, an USART incoming byte, an ADC end of conversion, a timer update, and many more… All those events are possible interrupt sources. In addition, the MCU features an advanced interrupt controller in order to handle multiple interrupt sources. Because an interrupt ‘B’ may occur while the MCU is executing the task dedicated to interrupt ‘A’, this controller must implement a priority mechanism and handle nested calls. In the STM32 product line (more exactly, with all Cortex-M ARM cores), this controller is called NVIC (Nested Vector Interrupt Controller). You can see it as a kind of master interrupt switch. Note that NVIC is part of the ARM Cortex-M core.
In order to work with an interrupt, one should perform the following setup:
Configure the source peripheral in order to enable interrupt signaling to the NVIC controller when a specified event occurs
Configure the NVIC controller to accept this signal as a valid interruption source with a given priority
Write the function that must be executed upon interruption
If steps 1 or 2 is missing, no interruption signal reaches the CPU. If step 3 is missing, the CPU hangs into an infinite loop being implemented as the default interrupt handler.
3.1. Setting up the peripheral to produce an interrupt
In this example, we want an action on the push button (pin PC13) to produce an interrupt signal. Let us edit the BSP_PB_Init() function in order to achieve that.
/*
 * BSP_PB_Init()
 * Initialize Push-Button pin (PC13) as input without Pull-up/Pull-down
 * Enable EXTI13 on falling edge
 */

void BSP_PB_Init()
{
	// Enable GPIOC clock
	RCC->AHBENR |= RCC_AHBENR_GPIOCEN;

	// Configure PC13 as input
	GPIOC->MODER &= ~GPIO_MODER_MODER13_Msk;
	GPIOC->MODER |= (0x00 <<GPIO_MODER_MODER13_Pos);

	// Disable PC13 Pull-up/Pull-down
	GPIOC->PUPDR &= ~GPIO_PUPDR_PUPDR13_Msk;

	// Enable SYSCFG clock
	RCC->APB2ENR |= RCC_APB2ENR_SYSCFGEN;

	// Select Port C as interrupt source for EXTI line 13
	SYSCFG->EXTICR[3] &= ~ SYSCFG_EXTICR4_EXTI13_Msk;
	SYSCFG->EXTICR[3] |=   SYSCFG_EXTICR4_EXTI13_PC;

	// Enable EXTI line 13
	EXTI->IMR |= EXTI_IMR_IM13;

	// Disable Rising / Enable Falling trigger
	EXTI->RTSR &= ~EXTI_RTSR_RT13;
	EXTI->FTSR |=  EXTI_FTSR_FT13;
}
Some explanations:
We want to generate an interruption upon action on the user button. When button is pushed down, we have a falling edge on pin PC13.
The peripheral that handles external interruptions is EXTI. EXTI has 16 inputs (lines) [0-15] which is lower than the number of available I/Os on the MCU. Therefore, we need to choose which pin is used for which EXTI line.
Basically, EXTI line n can be connected to any GPIOx number n. For instance, EXTI line 13 can be connected to one of the pins PA13, PB13, PC13, PD13, PE13, PF13. This is done using the SYSCFG registers.
Once the chosen pin is connected to EXTI controller, one need to enable the corresponding EXTI line (within the EXTI peripheral), and then choose whether Rising and/or Falling edge is selected to generate an interrupt signal.
When all the above is correctly set, the interrupt signal is generated and sent to the NVIC controller. At this moment, the signal is not allowed to interrupt the CPU yet.

3.2. Setting up NVIC controller
NVIC controller is the circuitry that receives all the interrupts signals and decides whether CPU must be interrupted or not. It also manages interrupts priorities.
A good practice is to setup NVIC apart from the peripheral setup for at least two reasons:
Grouping NVIC settings in one function for all your interrupts sources gives you a better overview of what interrupts are allowed, and what is the priority hierarchy.
As soon as NVIC is enabled, interrupts may occur. You probably want to complete all the peripheral initializations before this happens. Therefore, NVIC should not be set within peripheral initialization but rather called from the main() function when everything is prepared to correctly handle interrupts.
Add this function to your bsp.c file:
/*
 * BSP_NVIC_Init()
 * Setup NVIC controller for desired interrupts
 */
void BSP_NVIC_Init()
{
	// Set maximum priority for EXTI line 4 to 15 interrupts
	NVIC_SetPriority(EXTI4_15_IRQn, 0);

	// Enable EXTI line 4 to 15 (user button on line 13) interrupts
	NVIC_EnableIRQ(EXTI4_15_IRQn);
}
Then, add the prototype declaration in bsp.h:
/*
 * NVIC initialization
 */
void BSP_NVIC_Init				(void);
Now try this simple program:
// Main function
void main()
{
	// Configure System Clock
	SystemClock_Config();

	// Initialize Button pin
	BSP_PB_Init();

	// Initialize Console
	BSP_Console_Init();
	my_printf("Console Ready!\r\n");

	// Initialize Timer Delay
	BSP_DELAY_TIM_init();

	// Initialize NVIC
	BSP_NVIC_Init();

	// Main loop
	while(1)
	{
		// Some important stuff to do
		my_printf(".");
		BSP_DELAY_TIM_ms(200);
	}
}
Save all ![]() , and build
, and build ![]() the project. Then, launch the debugger
the project. Then, launch the debugger ![]() and start the program execution
and start the program execution ![]() . You should see dots printing in the console.
. You should see dots printing in the console.
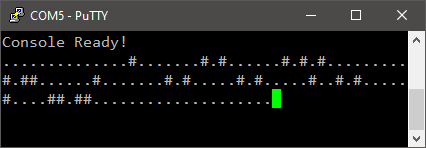
Then press the user button. The dot printing stops. You are now experiencing a crash in the program execution. MCU will not respond to anything anymore…
Suspend the program execution
 to see what the MCU is actually doing. You will discover that execution has been trapped into an infinite loop doing nothing called “Default Handler”.
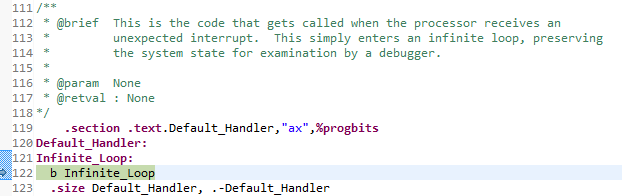
This is what happens when you’ve setup an interrupt but did not write the corresponding interrupt handler. The interrupt worked fine, but the dedicated task to perform has not been defined yet, and the processor ends up in a default task, which is an infinite empty loop.
3.3. Writing the interrupt handler (ISR)
As said before, interrupt signal is carried by hardware. When the interrupt signal is propagated by the NVIC controller, the program execution will automatically branch to a specific code memory address. This particular code memory address has to be specified somewhere. It is located in a memory reserved area called the “interrupt vector table”. Open the assembler file startup_stm32f0xx.S in the main editor and scroll down to the following lines:
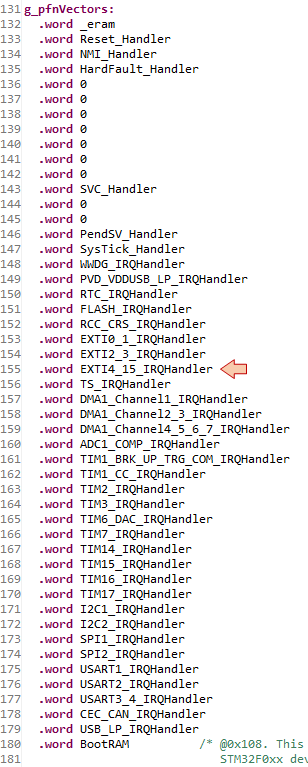
This is the definition of the STM32F0 interrupt vector table. These are actually function calls, depending on the received interrupt signal. Based on this list, one can guess that the likely name of the function being called upon EXTI13 event is EXTI4_15_IRQHandler().
A function such as EXTI4_15_IRQHandler() is known under the name of “Interrupt Handler”, or “Interrupt Service Routine (ISR)”. It is the function that “handles” or “serves” the interrupt event.
Interrupt handler implementation may be written anywhere in your project file structure. It could be associated to main.c, or to bsp.c, or anywhere you like. Although, it is a common practice to group interrupt handlers into one source file under app/src called stm32f0xx_it.c.
Let us add our ISR implementation for EXTI line 13 interrupt:
/******************************************************************************/
/*                 STM32F0xx Peripherals Interrupt Handlers                   */
/*  Add here the Interrupt Handler for the used peripheral(s) (PPP), for the  */
/*  available peripheral interrupt handler's name please refer to the startup */
/*  file (startup_stm32f0xx.s).                                               */
/******************************************************************************/

/**
  * This function handles EXTI line 13 interrupt request.
  */

void EXTI4_15_IRQHandler()
{
	// Test for line 13 pending interrupt
	if ((EXTI->PR & EXTI_PR_PR13_Msk) != 0)
	{
		// Clear pending bit 13 by writing a '1'
                // Do not use OR masking here
		EXTI->PR = EXTI_PR_PR13;

		// Do what you need
		my_printf("#");
	}

}
You need to include stm32f0xx.h to this file in order to get access to register names. You would better add it to main.h which is already included in stm32f0xx_it.c.
You may have already noticed that the interrupt handler EXTI4_15_IRQHandler() is shared between external interrupt lines ranging from 4 to 15. So far in our application, there is no chance that any other line than 13 produces an interrupt (only line 13 has been enabled in the EXTI peripheral). Anyhow, it is highly recommended to always check the interrupt origin at the beginning of the ISR.
Therefore, the first task is to make sure that the function call is the result of an event on pin PC13. For that, we can read a flag in the dedicated EXTI controller register to see what line actually produces the interrupt signal.
Then, you need to clear the interrupt flag in the EXTI controller. If you omit this operation, the interrupt will be considered as not serviced, and no further interrupt signal will be triggered from this source. So clearing the interrupt flag is the correct (and only) way to indicate that an interrupt is serviced. That's mandatory.
Finally, the dedicated task is a simple ‘#’ print to the console. If the ISR is performing all the tasks you want in response to an event, the main program can just forget it. Leave the main() function as it is, build and run the application.
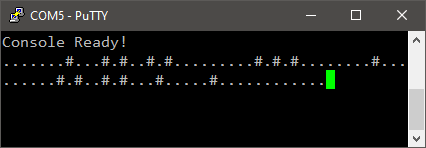
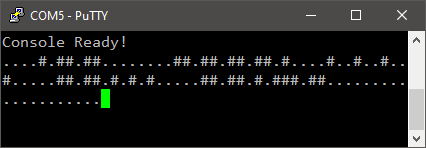
Play with the user button:
In comparison with the polling approach seen before, you can notice that no button event is lost this time. We can even process several events (i.e. successive ‘#’) during the “important stuff” the MCU is doing.
| - - |
3.4. Taking care of ISR execution time
Since an interruption suspends main code execution during the time ISR is executed, it is highly recommended to keep ISR execution time as short as possible. Doing that can also avoid a large number of nested interrupt calls (i.e. interruption of an interrupt handler by a higher priority interrupt). In the previous example, we used the ISR to send the character ‘#’ to the console. When you play with the code, you will see the ‘#’ character appear in the console almost instantaneously when you press the button. However, sending bytes via a serial communication port (the UART used behind the my_printf() function) is intrinsically a slow process and should be avoided in any well written ISR.
Do we really want to immediately process the interrupt signal?
If not, then let us just use a variable to keep a trace of the event occurrence, and then process that information in the main loop, when we have time.
Edit the main.c file as follows:
...

// Global variable
uint8_t	button_irq = 0;

...

	// Main loop
	while(1)
	{
		// Process button request if needed
		if (button_irq == 1)
		{
			my_printf("#");
			button_irq = 0;
		}

		// Some important stuff to do
		my_printf(".");
		BSP_DELAY_TIM_ms(200);
	}

...
Here, we declare a global variable button_irq that will be used to keep record of the Push Button event (i.e. the PC13 interrupt signal). The task of ‘#’ printing is then performed only when button_irq is set, and is not suspending anymore the “important stuff” the CPU is doing in the main loop.
The ISR can be now made much faster by simply setting the button_irq variable:
extern uint8_t button_irq;

void EXTI4_15_IRQHandler()
{
	// Test for line 13 pending interrupt
	if ((EXTI->PR & EXTI_PR_PR13_Msk) != 0)
	{
		// Clear pending bit 13 by writing a '1'
		EXTI->PR = EXTI_PR_PR13;

		// Do what you need
		button_irq = 1;
	}
}
Build and flash the project into the target. Open the console and play with the Push Button. Is it behaving as expected?
The ‘#’ sign is now only printed when the MCU is not performing the “important stuff”. Although, if you toggle the button like crazy, you will notice that only one ‘#’ is printed between dots.
Well, if that matters, let us catch multiple events. Edit the ISR this way:
extern uint8_t button_irq;

void EXTI4_15_IRQHandler()
{
	// Test for line 13 pending interrupt
	if ((EXTI->PR & EXTI_PR_PR13_Msk) != 0)
	{
		// Clear pending bit 13 by writing a '1'
		EXTI->PR = EXTI_PR_PR13;

		// Do what you need
		button_irq++;
	}

}
And then edit the main loop:
	while(1)
	{
		// Process button request if needed
		while(button_irq > 0)
		{
			my_printf("#");
			button_irq--;
		}

		// Some important stuff to do
		my_printf(".");
		BSP_DELAY_TIM_ms(200);
	}
Build the project, flash the target, open the console and play with the button.
Now you can record multiple actions on the button while the MCU is busy with “important stuff”, and then process all those actions when time has come. The ISR has been kept as short as possible, which is always a good thing.
| - - |
4. Summary
In this essential tutorial, you have learned how to setup an External Interrupt, and how to write the corresponding handling function (ISR).
- Log in to post comments